Restoring Dehydrated Insects for Macro Photography
/How do we get a bone-dry bug ready to have its portrait done?
That is a loaded question! There is a lot that needs to be done before a completely dehydrated insect can be made presentable for high-resolution macro photography.

Pre-dehydration
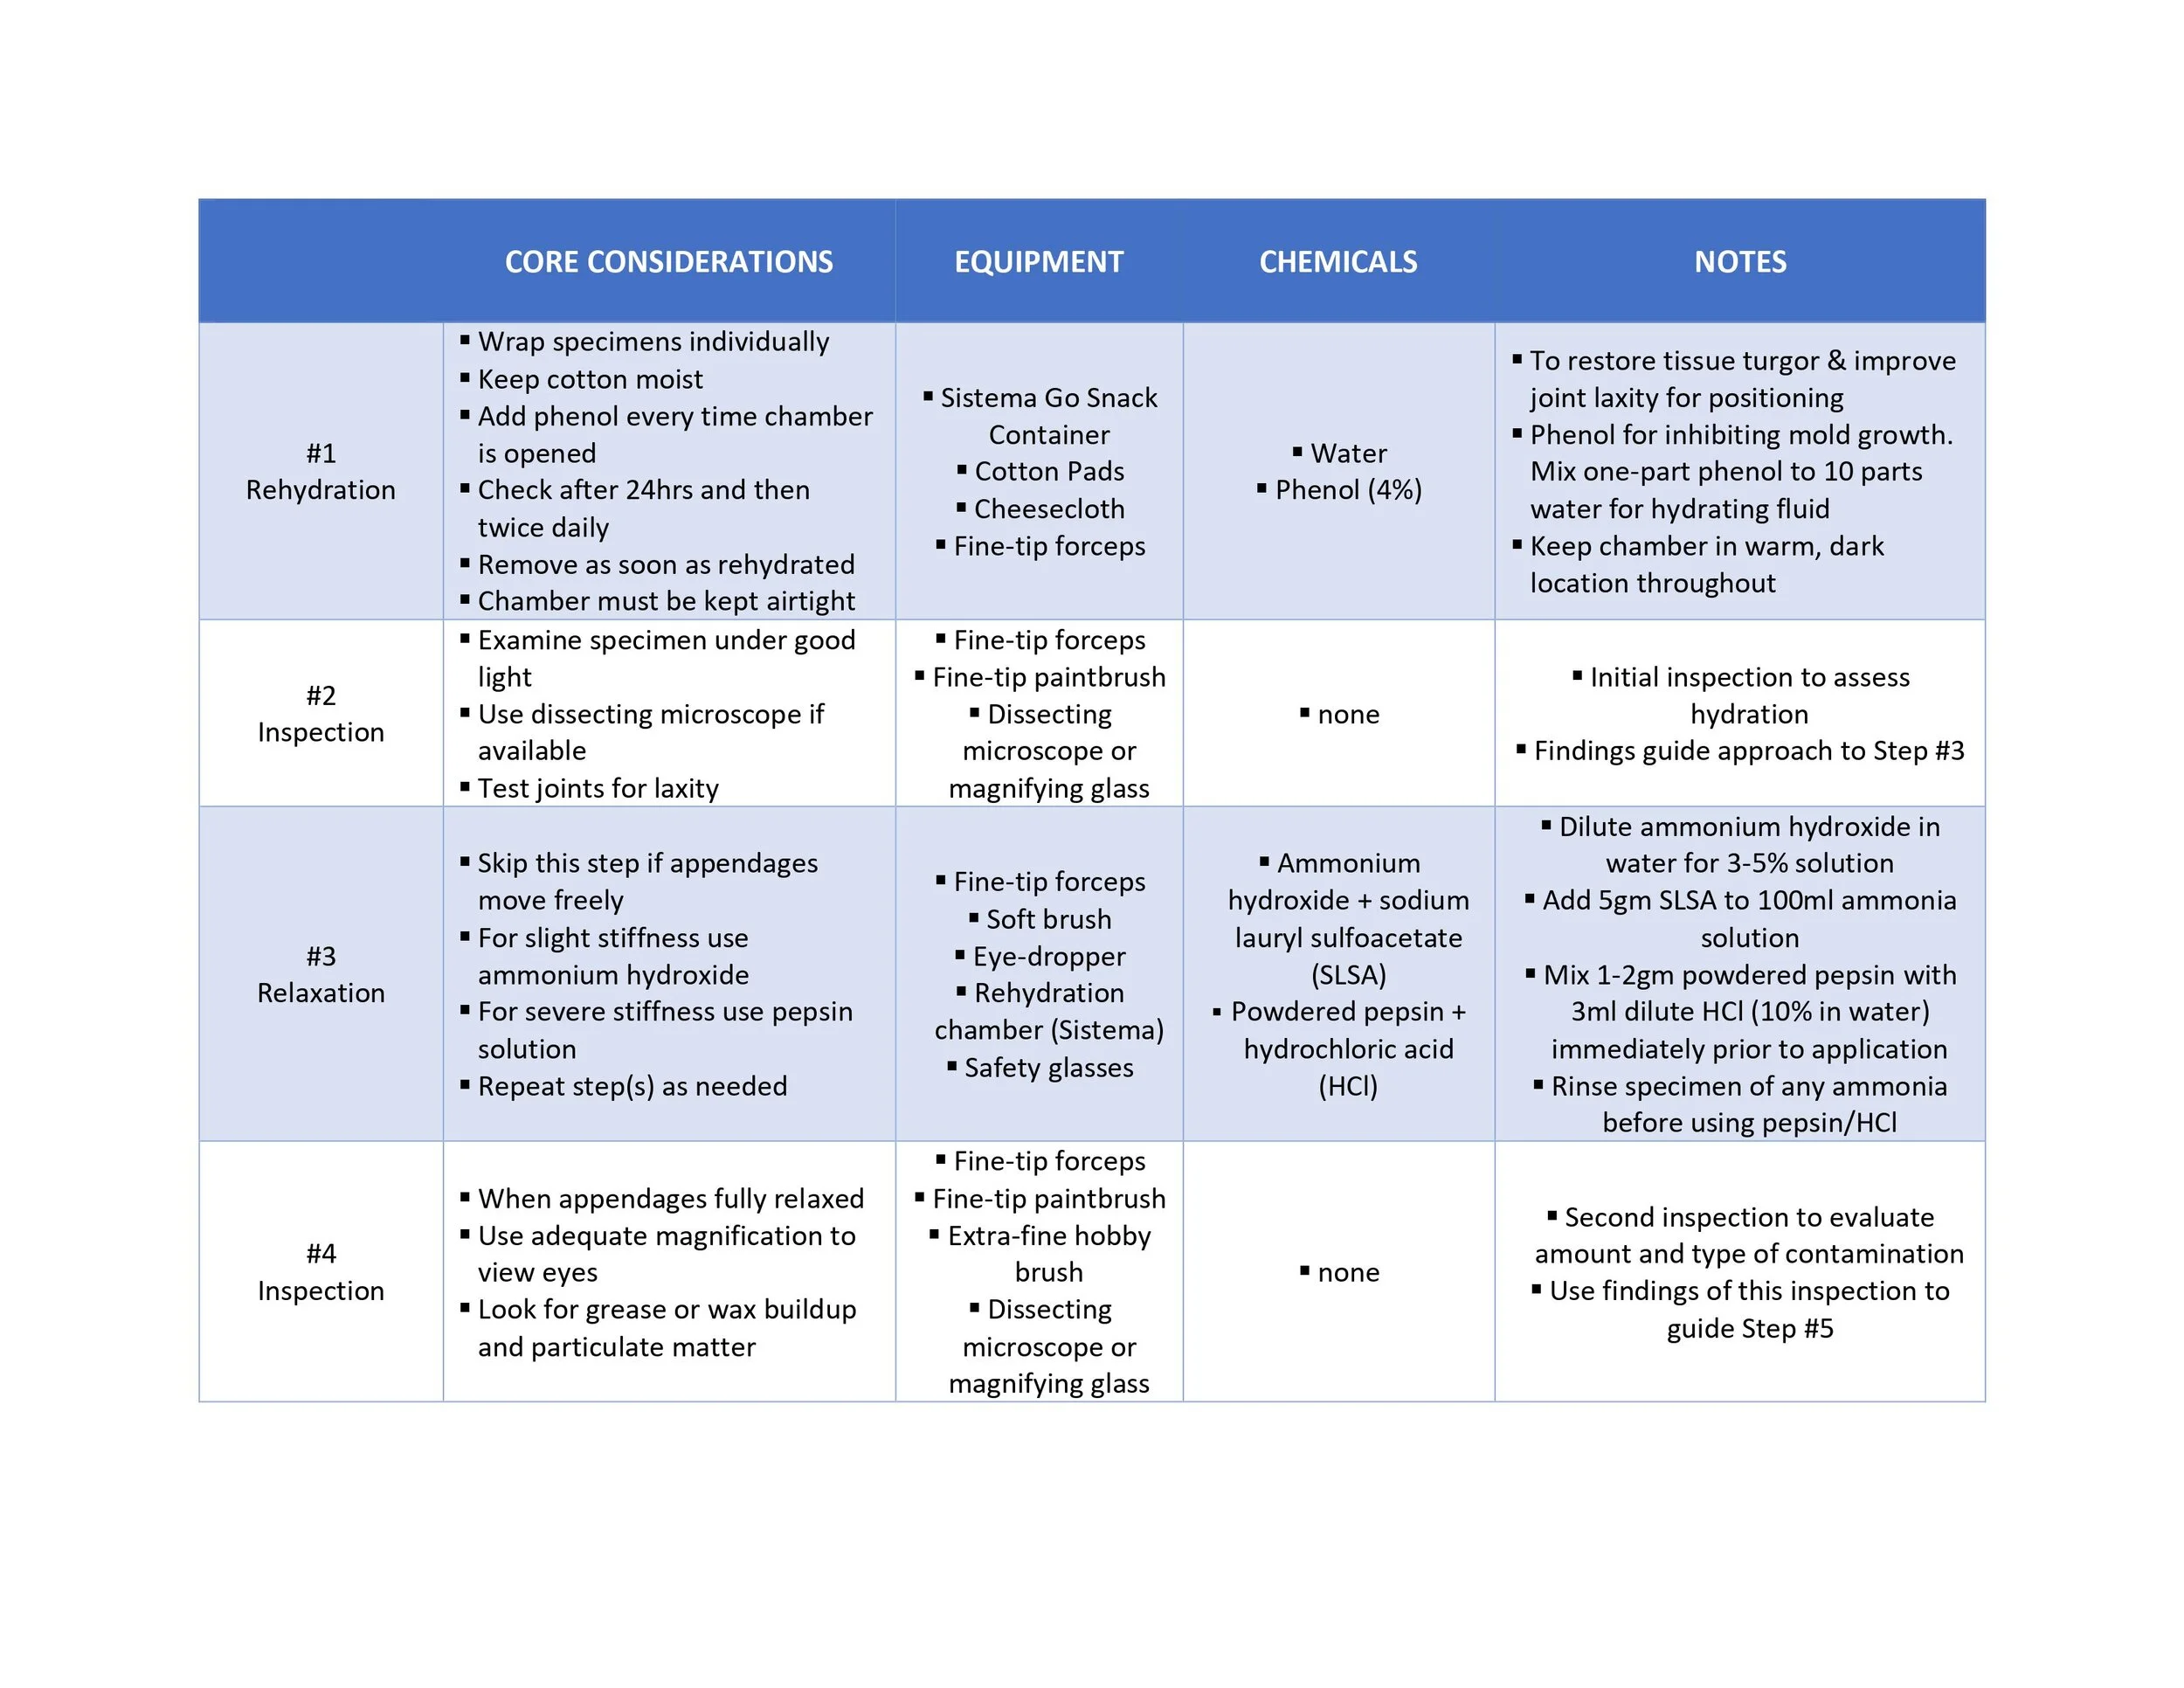
To make everything easier to follow, I have divided the process up into eight distinct steps, as follow:
Rehydration
Inspection
Relaxation
Inspection
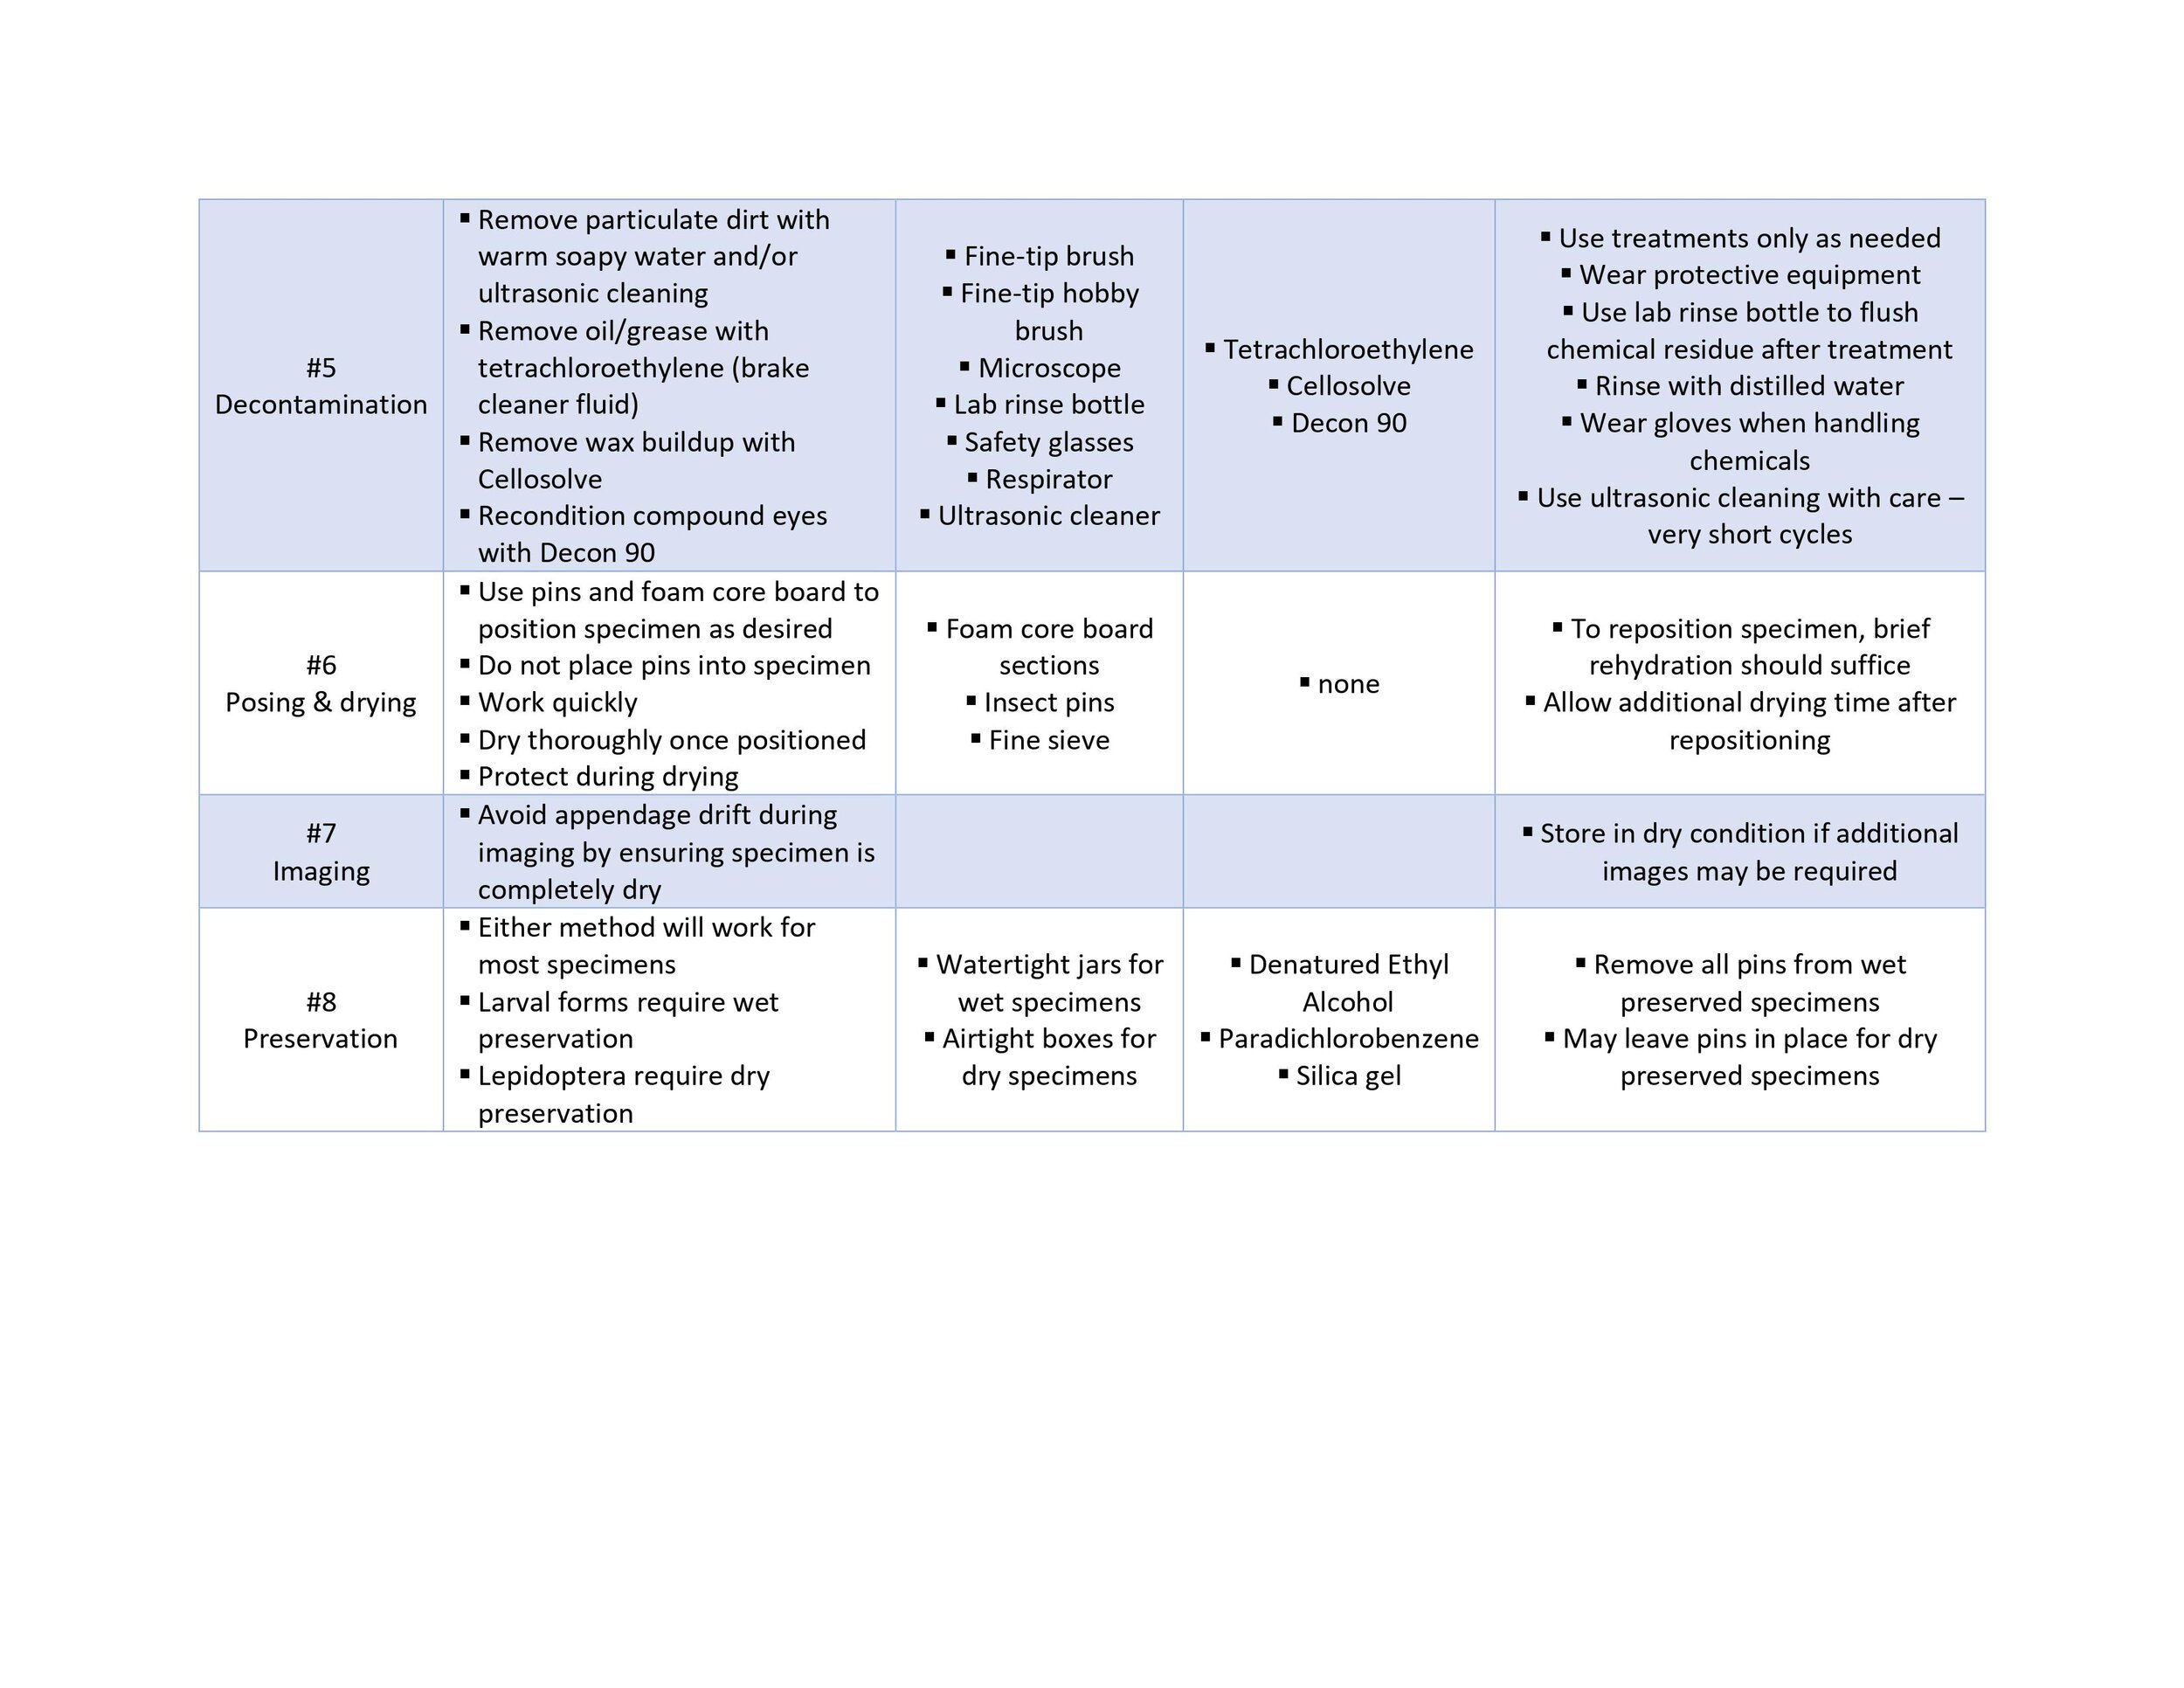
Decontamination
Fixation
Photographicalization (made that one up)
Preservation
Each step is meant to be completed before moving on to the next. Within each step there may be a few sub-steps, but all of that is discussed in the video, summarized in the table (at the end of the article), and available in this free PDF download:
Listed below are all the items of equipment and chemicals that are used in the video or included in the free guide. Be aware that, as an Amazon Affiliate, I may earn from qualified purchases made using some of these links. For full details see my Disclosure Page.
Chemicals Used
Ethyl acetate - this is my preferred method for euthanizing live specimens. Highly effective and very safe.
Denatured Ethyl Alcohol - this is my choice for wet-preserving specimens that have previously been dehydrated. Colors are better preserved than with isopropyl alcohol.
Phenol - also known as carbolic acid, this is what I use to prevent mold growth during rehydration.
Cellosolve - also known as ethyl cellosolve, this is my preferred substance for removing stubborn waxy buildup from insects.
Hydrochloric Acid - this reagent is required to activate the enzyme pepsin, which I use to relax stubborn appendages.
Pepsin - a powerful enzyme, very effective for relaxing difficult appendages - requires activation by low pH hydrochloric acid.
Decon 90 - this blend of powerful surface acting agents is the most effective compound eye cleaner that I have ever used!
Ammonium hydroxide - when mixed with a surfactant, this in my first line of attack for relaxing insect appendages.
Brākleen Brake Cleaner - an inexpensive and easy to find source of tetrachloroethylene, also found in dry cleaning fluid, which is a potent degreasing solvent. Excellent for removing oil and fat residues from matted insect hairs.
Sodium Lauryl Sulfoacetate - a big name for a very effective surfactant, used to boost the effectiveness of ammonium hydroxide when relaxing insect appendages.
Para Dichlorobenzene crystals - used in mothballs, this is an excellent mold retardant for use in dry-storage of insect specimens. It is the main ingredient in this anti-moth preparation.
Equipment & Supplies Used
This list covers all the equipment that I use in my restoration, cleaning, and preserving of macro specimens. The items are listed in no particular order!
AmScope Dissecting Microscope - This is one of the most important tools that I own, and an absolute necessity for preparing and posing insects. It is a tremendous bargain, especially given the fantastic quality of this optical microscope!
Rehydration Chamber - that is a pretty fancy name for Sistema’s snack box - but it has earned the name - this is the most practical, inexpensive and durable rehydrating chamber I have ever used. I own over 150 storage containers from this company and I use them to store everything from bugs to thousand-dollar microscope objectives!
Microscope Alternative - I used this articulating magnifier lamp for many years, before finally acquiring my microscope. I will never go back, but I was able to accomplish a great deal with this handy gadget!
Cotton Pads - this is my preferred brand for cotton pads. You can probably use any cotton, but I like this one because it doesn’t shed fibers and holds a ton of water/phenol. Love this brand!
Lab Rinse Bottle - this is a must-have piece of gear, especially during the cleaning cycles in insect prep. It allows me to apply a gentle but steady flow of purified mater to rinse off the caustic chemicals we use.
Ultrasonic Cleaner - there are tons of these devices on the market and they all seem to do a decent job, but I have been using this model for about 5-years with no complaints. Be sparing when using ultrasonic cleaners with previously dehydrated specimens!
Fine-tip Tweezer Set - this is one of the indispensable tools in macro photography. This set is very inexpensive but they are perfect for small insects.
Insect Pins - I have been using this brand of pins for as long as I can remember. They are coated in black enamel, making them very easy to remove from photographs. They come in a whole range of sizes and the slightly heavier ones are easier to use for positioning.
Cheesecloth - the perfect material for wrapping delicate specimens before rehydrating. The open weave allows the insect to “breathe”, while keeping a layer of moisture around the body parts. This is the brand that I prefer.
Fine Paintbrushes - perfect for positioning delicate appendages, applying chemicals and removing dust and dirt particles. Get the set, as you will want the broader brushes for removing chemicals before rinsing.
Chemical bottles - We only use small amounts of the chemicals, so to keep mu workspace uncluttered, I use these little dropper bottles for ammonia, acid, dissolved powders, and purified water. The droppers are very helpful for applying small amounts of the chemicals. You will need to label them at the time you fill them, so have labels available.
Storage Bottles - I also like to transfer all my bulk chemicals to larger dark glass bottles - not absolutely necessary, but it keeps my lab area looking neat and tidy.
Nylon Strainer - another must-have piece of gear. Useful for gently washing insects under running water, fishing them out of the ultrasonic cleaner, and covering specimens as they dry.
Magnifier Visor - Before getting my first microscope, this was my go-to magnifying solution for this kind of work. Not as bright as the magnifying lamp, but very handy for when I’m moving around the bench. I still use them regularly for larger specimens that don’t need the microscope.
Miniature Hobby Brushes - these are extremely useful for the cleaning phase of insect prep. They are a little firmer than the paintbrushes and that makes them ideal for combing bug hair and physically dislodging grease and oil. Don’t use these brushes on the compound eyes - it will scratch them.
If I have failed to provide a link for something I used in this video, please let me know and I will help you find what you are looking for. That was a pretty long list!
Here is the video that all this stuff pertains to:
And finally, this is the guide - a summary of the all the steps discussed in the video. There is a download button further up the page, if you would like to get a copy for your own personal use.